When you engage in the online business and the Shopify platform, you may want to know How to build a Shopify 2.0 theme from scratch. Well, We will try to answer your question in this article.
We will clarify exactly what a theme on Shopify is before going through the steps to build a Shopify 2.0 theme from the beginning. Let’s get straight into the details!
What is a theme on Shopify?
A theme on Shopify is a collection of templates, styles, and functionality that determines the look and feel of an online store. It provides a framework for the layout and design of a store’s pages, including the homepage, product pages, and checkout process. So, the theme is a template that decides the front-end appearance of your Shopify store.
Using the theme editor, you can customize your theme settings in your Shopify admin. If your theme does not have a setting for a modification, then you can adjust your theme code.
Changing your theme or switching to a new theme will not influence the other parts of your account. In other words, you can try different theme styles and settings without making a fuss about the remainder of the content from your admin. Shopify offers a range of pre-designed themes that merchants can choose from, as well as the option to create a custom theme from scratch or modify an existing theme using the online theme editor.
With pre-built themes, your store (particularly a newbie store) can be on track and operate speedily. The marketplace enables you to work a store out in practice in hours, or even less compared to weeks or months if you create an entirely custom eCommerce store.
Themes can be customized in many ways, including changing the layout and color scheme, adding or removing sections, and adding custom functionality using Shopify’s Liquid programming language. Using a theme allows merchants to quickly and easily set up their store’s design and layout without needing to write HTML and CSS code from scratch. It also makes it easy to update the look and feel of a store over time as the business grows and evolves.
Another advantage of using pre-built themes is in terms of low fees. More specifically, you do not have to pay a developer or invest your time and effort in line-by-line customization. You only have to perform a one-click installation with only some modifications to settings and flexible branding options, and you can customize a theme quickly to bring a new look to your store.
However, pre-built themes have drawbacks, like limited scalability designed for non-technical users and limited customization. They are also designed for aesthetics but not significantly for conversions. For these reasons, you can build a custom theme for your Shopify store instead.
Shopify Online Store 2.0 Changes
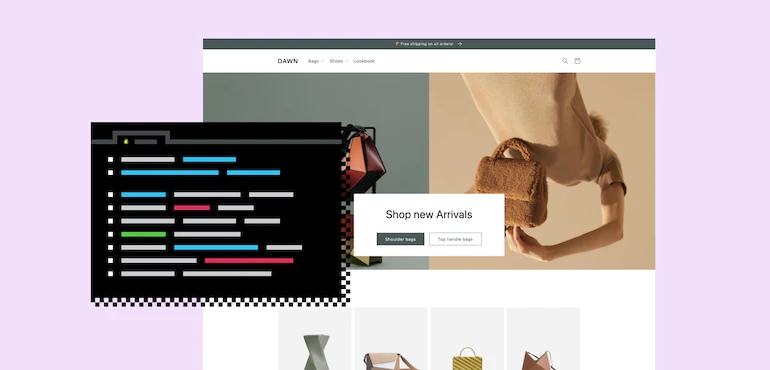
Shopify Online Store 2.0 was released in April of 2021 and brought with it a number of changes that have implications for store owners and developers. The most notable change is the switch to a new, responsive theme called “Dawn,” which is designed to work across all devices. Other changes include an updated checkout process, new order management features, and a number of smaller tweaks and improvements.
For store owners, the biggest change is likely the switch to the new responsive theme. This can have a significant impact on your store’s design and layout and may require some changes to your existing theme or customizations. The good news is that Shopify has made it easy to switch between the old and new themes, so you can experiment and see what works best for your store.
For developers, the biggest change is the switch to using Shopify’s new GraphQL API. This new API provides a more efficient way to query data from Shopify and opens up a number of new possibilities for building custom applications and integrations. If you’re currently using the Shopify API, you’ll need to update your code to use the new GraphQL endpoint.
Overall, the changes in Shopify Online Store 2.0 are mostly positive and should make for a better experience for both store owners and developers. If you have any questions about the changes or need help updating your code, please feel free to reach out. We’re always happy to help!
Benefits Of Shopify Online Store 2.0
Shopify Online Store 2.0 is a major update to the popular e-commerce platform, bringing numerous new features and improvements to help merchants build and manage their online stores more effectively. As a developer, there are several benefits to working with Shopify Online Store 2.0:
- Improved design: The new design is more visually appealing and user-friendly, making it easier for developers to build and customize stores for their clients.
- Enhanced customization options: Shopify Online Store 2.0 offers more flexibility and customization options, allowing developers to tailor stores to their client’s specific branding and aesthetics.
- Improved performance: The new design is faster and more efficient, helping stores load more quickly and providing a better overall user experience.
- Enhanced security: Shopify Online Store 2.0 includes a number of security enhancements, including improved data encryption and fraud prevention measures, helping developers build more secure stores for their clients.
- New integrations: Shopify Online Store 2.0 includes a number of new integrations, including support for Google Shopping and Facebook Shops, making it easier for developers to build stores that are compatible with these platforms.
- Improved developer tools: Shopify Online Store 2.0 includes a number of enhancements to the developer tools and APIs, making it easier for developers to build and customize stores for their clients.
- Enhanced documentation: The updated documentation for Shopify Online Store 2.0 is more comprehensive and easier to use, helping developers get up to speed quickly and build more effective stores.
Overall, Shopify Online Store 2.0 offers numerous benefits to developers, helping them build and customize high-quality online stores for their clients and providing a better shopping experience for customers.
How to build a Shopify Online Store 2.0 theme from scratch
Planning and Analyzing
Not only do you have to guarantee that you have all the technical knowledge before initiating the project, but you also have to ensure that you meet the non-technical requirements. Reviewing different Shopify theme design options before heading to build your Shopify theme is crucial.
Creating a custom Shopify theme is an exciting project that can help you differentiate your online store from others and provide a unique and personalized shopping experience for your customers. However, it’s important to carefully plan and analyze your theme before diving into the development process.
Here are some key steps to follow when planning and analyzing a custom Shopify theme:
- Define your goals and target audience: Before you start designing your theme, you must understand what you want to achieve and who you are designing for. Consider what your goals are for the theme (e.g., increasing sales, improving customer experience), and think about the demographics and preferences of your target audience. This will help guide your design decisions and ensure that your theme aligns with your business objectives.
- Research and analyze competitors: Take some time to research and analyze the themes of your competitors to get an idea of what works and what doesn’t. Look at the layout, color scheme, and overall aesthetic of their themes, and think about how you can differentiate your theme from theirs.
- Create a rough outline and wireframe: Once you have a good understanding of your goals and target audience, start outlining the structure and layout of your theme. A wireframe is a simple visual representation of your theme that shows the layout of different elements, such as the header, footer, and main content area. This will help you understand your theme’s look and function before diving into the design process.
- Choose a starter theme: Shopify offers a range of starter themes you can use as a starting point for your custom theme. These themes provide a basic structure and layout that you can customize and build upon. Choose a starter theme that aligns with your goals and target audience and fits the overall aesthetic you are trying to achieve.
- Please choose a color scheme and design elements: Once you have a rough outline and wireframe, it’s time to start thinking about the visual design of your theme. Choose a color scheme that fits your brand and resonates with your target audience, and select design elements such as fonts, images, and buttons that support your overall aesthetic.
By following these steps, you can effectively plan and analyze your custom Shopify theme and create a professional and effective online store that meets the needs of your business and your customers.
Learning the Liquid code
Liquid is a programming language used to customize and extend the functionality of Shopify themes. It is a powerful tool that allows developers to create dynamic and interactive elements in their themes, such as product listings, customer profiles, and checkout forms.
You may have spotted that some files have an .liquid extension. Liquid files are simply HTML files with embedded code in them. This embedded code is generated using curly braces like {{ }} and {% %} to make it easier for you to notice.
If you’re interested in creating a custom Shopify theme, learning Liquid is a key skill that will allow you to take full advantage of the platform’s capabilities. Here are some tips for getting started with learning Liquid:
- Familiarize yourself with the basics: Liquid has a straightforward syntax that is easy to learn, even if you have little or no programming experience. Start by familiarizing yourself with the basic building blocks of Liquid, such as variables, loops, and conditionals. There are plenty of online resources and tutorials available that can help you get started.
- Explore the Shopify documentation: The Shopify documentation is a great resource for learning about the various features and functions of Liquid. It includes detailed explanations of different Liquid tags, filters, and objects, as well as examples of how to use them in your theme.
- Practice, practice, practice: The best way to learn Liquid is to get hands-on experience by building and experimenting with your themes. Start by modifying existing themes or building simple templates, and gradually increase the complexity of your projects as you become more comfortable with the language.
- Join a community: There are many online communities and forums where you can ask questions, get feedback, and learn from other Shopify developers. These communities can be a great resource for learning Liquid and staying up to date with the latest best practices and trends in Shopify development.
By following these steps, you can learn Liquid and become proficient in using it to customize and extend your Shopify themes. With a little practice and persistence, you’ll be well on your way to creating professional and effective custom themes for your store.
Liquid enables us to manage our output and add logic to the templates without any back-end code knowledge. More specifically, with Liquide, you can make use of data from your store, which are product titles and prices.
First thing first, let’s take a look at the output. Below is a very simple example. If you want your <h2> element to show your product title, then you can utilize the product data accessibly, and do the following in your template:
<h2>{{ product.title }}</h2>
If Shopify executes a product page, your product title will replace the Liquid code. See how Liquid uses the “dot” syntax. Your product also has a price attached to it, which you can show the same by using the following:
{{ product.price }}
The “dot” enables you to gain access to various product properties and present that data.
If you want your product title to be uppercase, then it will be a piece of cake too:
<h2>{{ product.title | up case }}</h2>
With Liquid, you can create elements rapidly. For instance, an image tag:
{{ 'logo.png' | img_tag }}
When done, it will generate the HTML as below:
<img src="logo.png" alt="" />
It won’t do much good, as a consequence, as it has culminated in a relative approach to the file, which is simply not going to work. By inserting an additional filter, Shopify will attach the entire access to the file. For clarification purposes, you can insert in your alt Text:
{{ 'logo.png' | asset_url | img_tag: 'Site Logo' }}
It will generate the HTML as below:
<img src="/files/shops/your_shop_number/assets/logo.png" alt="Site Logo" />
Liquid also allows you to manage the page flow. For example, if there is a sold-out item, you can deliver a message to your customers. Liquid logic is very readable, so you can follow it easily.
Liquid will reach a particular store’s data and export it to an appropriate folder in the form. It will be a connection between the seller’s data and the code in the user’s browser. Hence, you can gain access to various variables without confronting any problems while you do it.
With Liquid, you do not have to worry about the data. It will be optional and beneficial if you create templates to sell to various clients. Not only that, but you can also use the Liquid Cheat Sheet, which assists new users in bookmarking, outlining different elements, and adding their descriptions.
Understand Shopify theme architecture
So, how to design a Shopify theme? First, you need to have a general understanding of how Shopify theme architecture functions. Theme architecture controls how features and elements are displayed in an e-commerce store. The placement of these features, such as templates and sections, determines the overall style and feel of an online store.
In July 2021, Shopify released an update called Online Store 2.0 that introduced a new theme architecture to the platform. This update centered on expanding customization options and presenting new developer tools to make developing custom Shopify themes and apps easier.
In addition, the update introduced a new template structure — JSON templates — which made building Shopify themes from scratch less challenging. JSON templates are more productive in the development process as they minimize the amount of data needed to render the page. This approach also allows for more nuanced theme customization.
You can migrate your themes and apps to Online Store 2.0 following this Shopify guide. Upgrading to Online Store 2.0 isn’t mandatory. You can continue using pre-update versions of themes, which are now called vintage themes, without any errors. However, upgrading is recommended as you can take full advantage of new features and improvements.
Shopify theme architecture
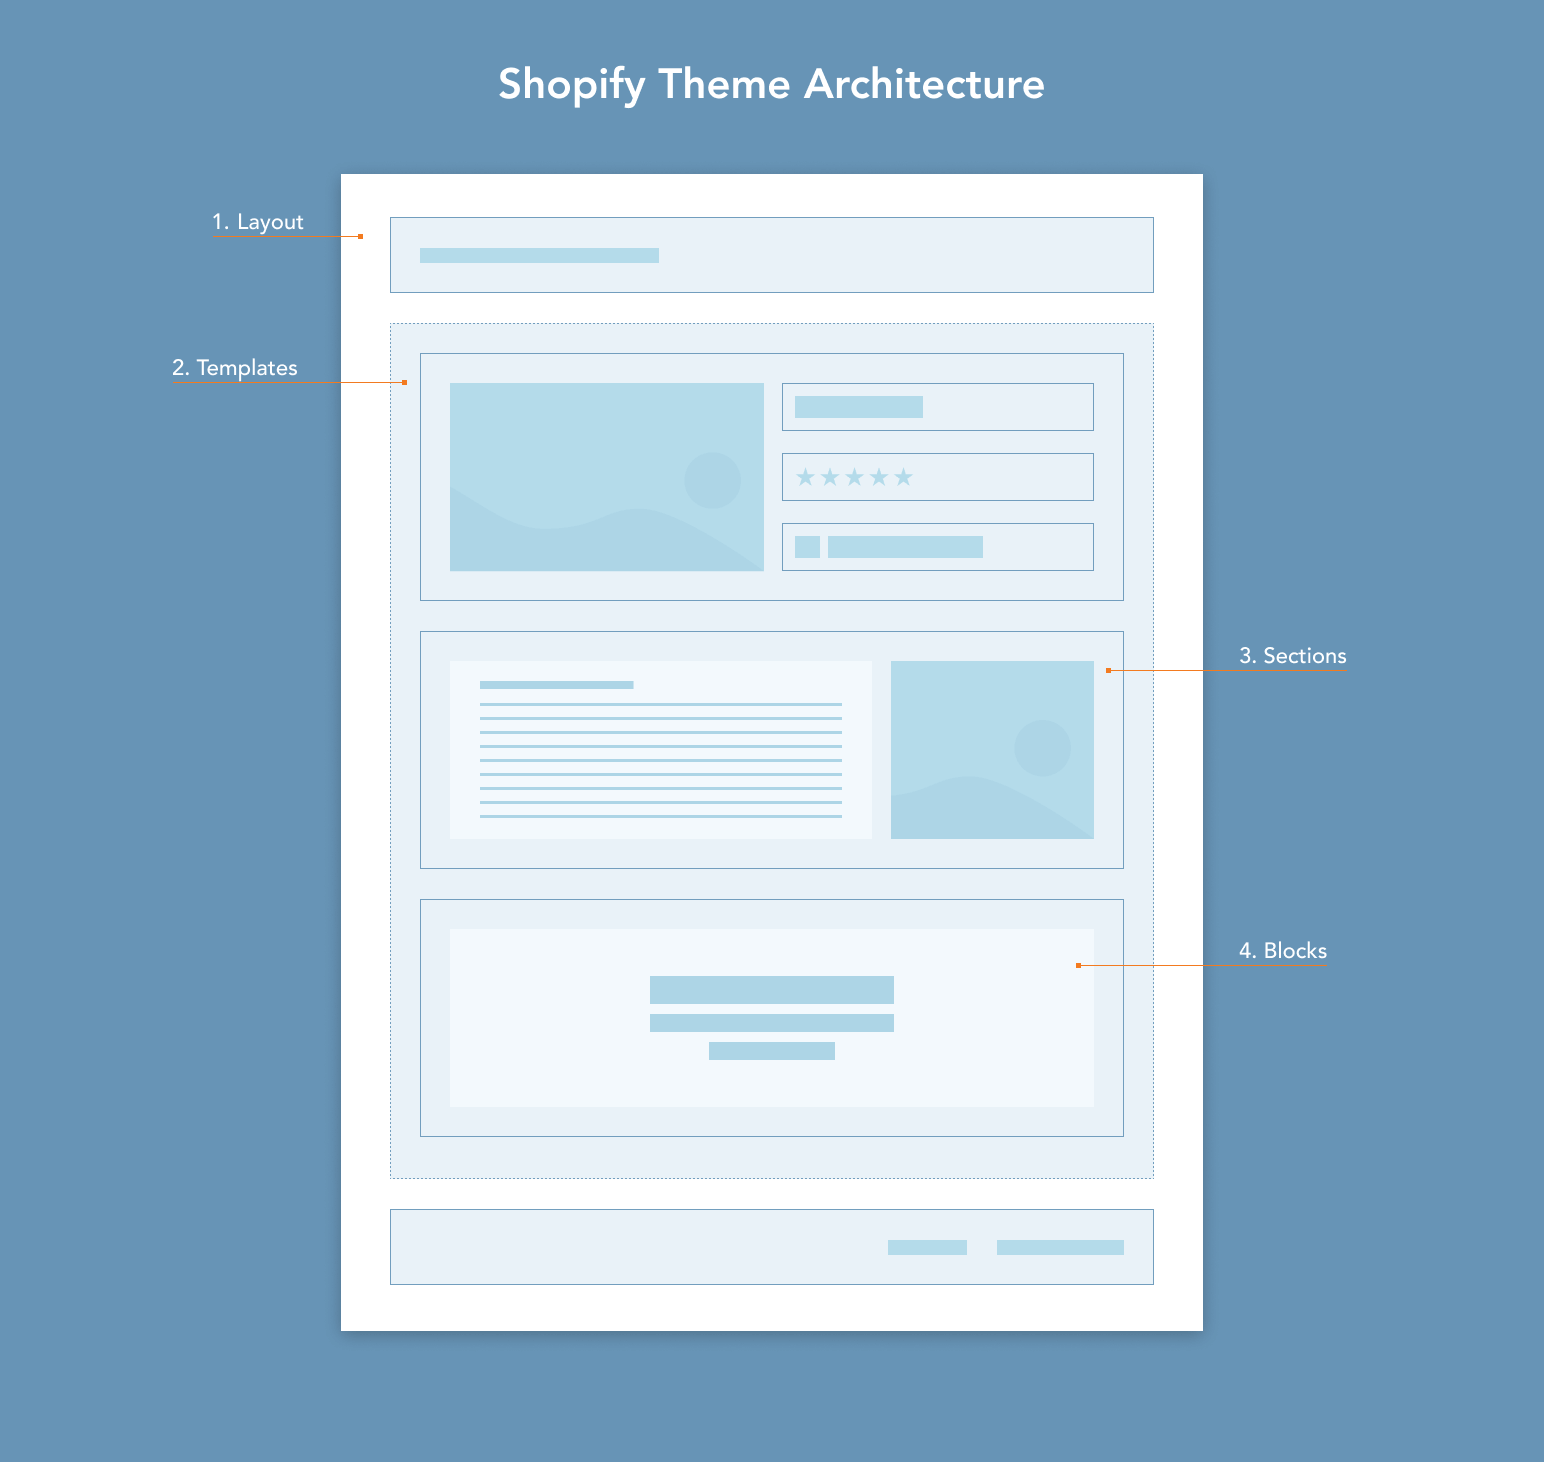
Shopify uses a standard directory structure to organize theme code files. Additionally, supporting assets such as images, CSS, and JavaScript files can be found in the directory. To help you understand how each page is organized within a theme, take a look at the image below:
Shopify theme architecture can be broken down into the following components:
- 1. Layout. The base of a theme can be reused across the website to feature the basics like headers and footers.
- 2. Templates. These elements control what’s displayed on the webpage. Each page has its own associated template type, which we will discuss more below. You can create multiple versions of the same template type to customize each page as you see fit.
- 3. Sections. Reusable modules of content that are displayed on the webpage. For example, you can create an “Image with text” section that will showcase an image and text side-by-side with options to customize its placement, colors, etc.
- 4. Blocks. Types of content modules can be added, removed, and reordered within a section. A block could be an image, a video, or text. You can add a maximum of 16 blocks per section.
Properly implementing all of these components is crucial to create functional custom Shopify themes. The great thing is that you can customize the placement, content, and look of every element inside your theme. This gives you an opportunity to create a unique brand look and optimize conversions by catering to your target audience’s needs.
Theme development workflow
Shopify has created a new paradigm for developing Shopify themes. They’ve created the Shopify CLI. This is great because in moving into the development of the Online Store 2.0 theme, one obvious issue with using themekit is that now that the templates are .json, you risk overwriting all the changes to content created in the customizer for all pages, not just the homepage anymore.
You could simply ignore all the JSON files, but it would mean that you wouldn’t have any of the theme setup changes tracked in GitHub, and if you tried to deploy the theme again, you would have to reset everything from scratch completely…not ideal!
The Shopify CLI allows the themes to be connected directly to Shopify from Github and allows for two-way syncing. This means that client changes in the theme editor get merged into the git repo that you can then pull to your local version, and everyone stays in sync.
It took me a little bit to wrap my head around this flow, so I’m writing it down.
INSTALL SHOPIFY CLI
First things first, install the Shopify CLI. I’m not going to go into this in depth because it varies depending on your setup, so here are the docs from Shopify.
CREATE A NEW SHOPIFY THEME AND INITIALIZE IN GitHub
Now that you have it installed, you can run the theme init command in the terminal. This will create a new theme (you’ll have the opportunity to name it) that is a clone of Shopify’s Dawn theme.
>> shopify theme init
Once that’s done, you’ll want to create a git repo and connect it to the theme you just cloned the way you normally would with any other repo.
>> git init
>> git remote add origin https://github.com/deartrudence/testing_cli.git
>> git branch -M main
>> git add .
>> git commit -m "initial commit"
>> git push -u origin main
ADD SHOPIFY THEME BY CONNECTING TO GITHUB
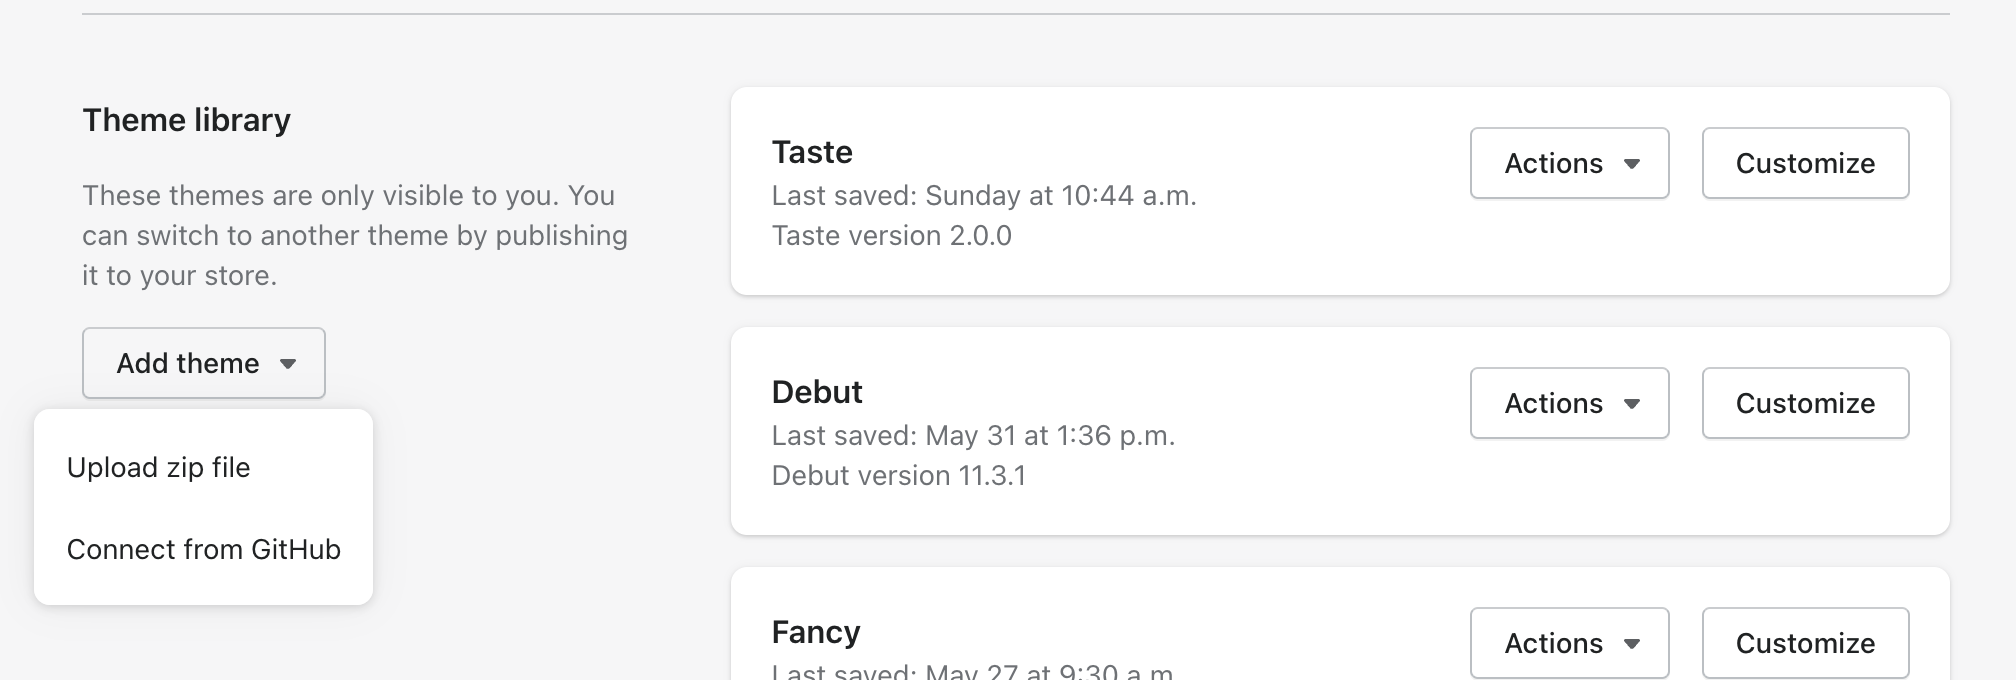
You’ll notice when you go to add a new theme in the Shopify admin; there’s a new option: Connect from GitHub
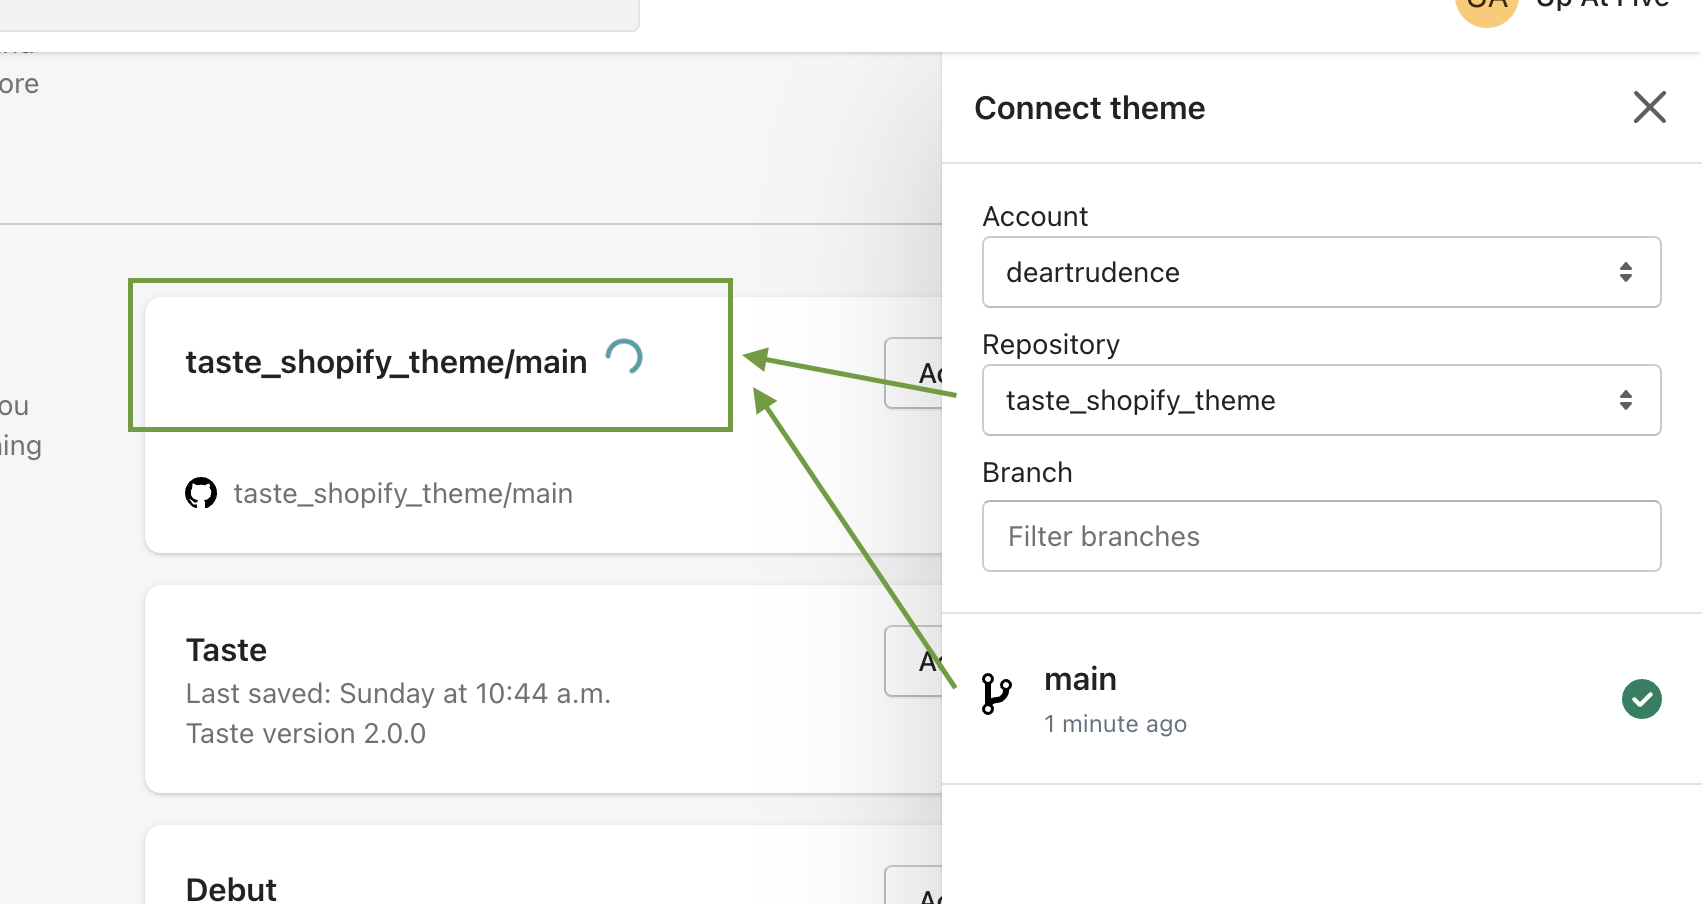
Choose this option, and you’ll have the opportunity to choose a repo and branch from your GitHub account. You may be prompted to log in with your GitHub credentials.
Once you hit connect, you’ll see a new theme created in your admin, which is the name of the repo and the branch.
<<repo>>/<<branch>></branch></repo>
Development 🔥 tip
Also create a development branch and connect it do a new theme in the same way. Then make sure to only push production ready changes to main 😉
LOG INTO THE STORE THROUGH CLI
You likely want to log into the Shopify store you want to develop. In the terminal, you’ll want to run the login command and set the store you’re developing. It may prompt you to login in through the browser or to choose a partner organization from the terminal.
>> shopify login --store [[store-name]].myshopify.com
⛔️ERRORS⛔️
I did get the following error.
add the environment variable SHOPIFY_CLI_STACKTRACE=1I solved it by adding
export SHOPIFY_CLI_STACKTRACE=1to my bash_profileOnce did that I was able to see the full error:
403 (ShopifyCLI::API::APIRequestForbiddenError)
{"errors":"Unauthorized Access"}
I then realized I was logging in with the wrong credentials, even though I didn’t get an error when I was logging in.
SERVE THEME LOCALLY
Now you’re all set up to start developing! To do this, run the following command:
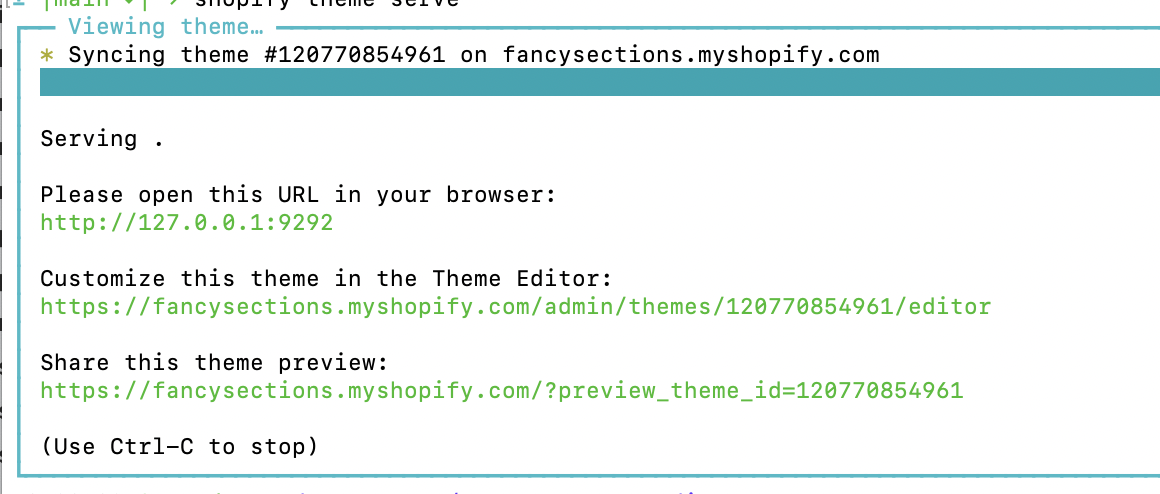
>> shopify theme serve
You’ll see this in your terminal, and you can go to the local host URL and see the theme. This is great for seeing your code changes, but what about configuration?
You’ll see the second URL down allows you to customize in the Theme Editor.
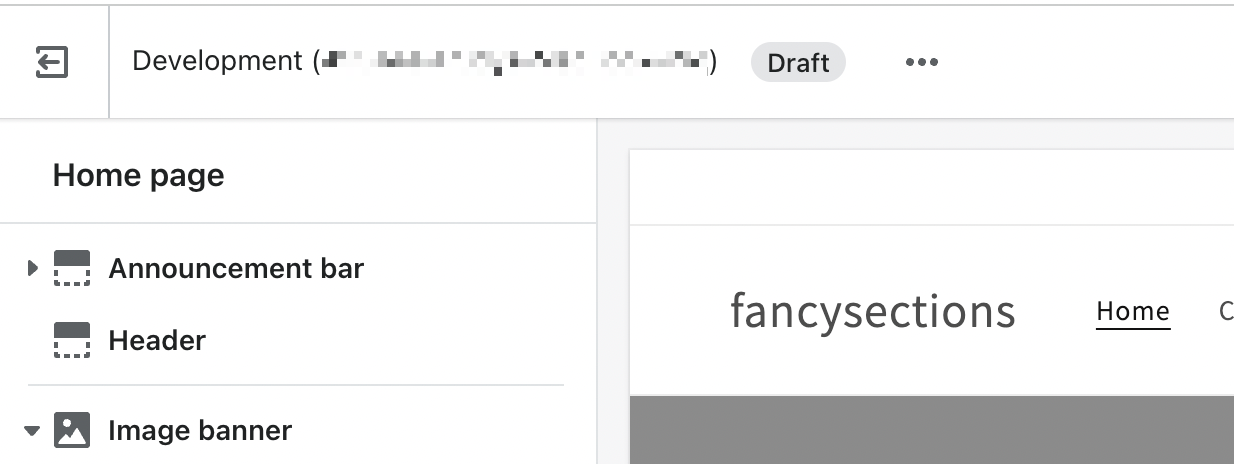
Going to that link will take you to the theme editor, but you’ll notice in the left-hand corner that the theme name is a temporary development theme based on the name of the device and some random alphanumeric value (I blurred now because I don’t know if it is meaningful in any way).
This is giving you the ability to customize the local version of your theme…yay 🎉
KEEP EVERYTHING IN SYNC
This is the point where I was a little confused about the whole process. If I’m doing all this configuration on the local host and my .json files aren’t updating based on those changes, how do I keep everything in sync?
This is where the theme pull command comes in. What I do is open a new terminal tab and periodically run the theme pull command – this syncs my local files to the changes made in the temporary theme editor, so I can make sure all the work I do doesn’t get overridden.
>> shopify theme pull
Happy theme coding 🙌




Leave a Reply